
This is the first of a multi-part series on some of the specific features of the LMS JupiterEd. While our district strongly promotes the Canvas LMS, my site finds JupiterEd to better suits our needs.
This is a beginning/intermediate level overview of JupiterEd and the features that I think are used the most. This will be most beneficial for those who are just starting out, need a refresher, or are just curious to learn more about JupiterEd.
NOTE: For my district, JupiterEd is linked to our Student Information System, PowerSchools. Therefore all of the student information is preloaded for us, as well as our classes. If you’re reading this and are not in our district, you will need to add students and set up your classes and gradebook yourself. Please see read this Help Guide on how to do add students, as well as how to Setup a Gradebook.
Grading Scale
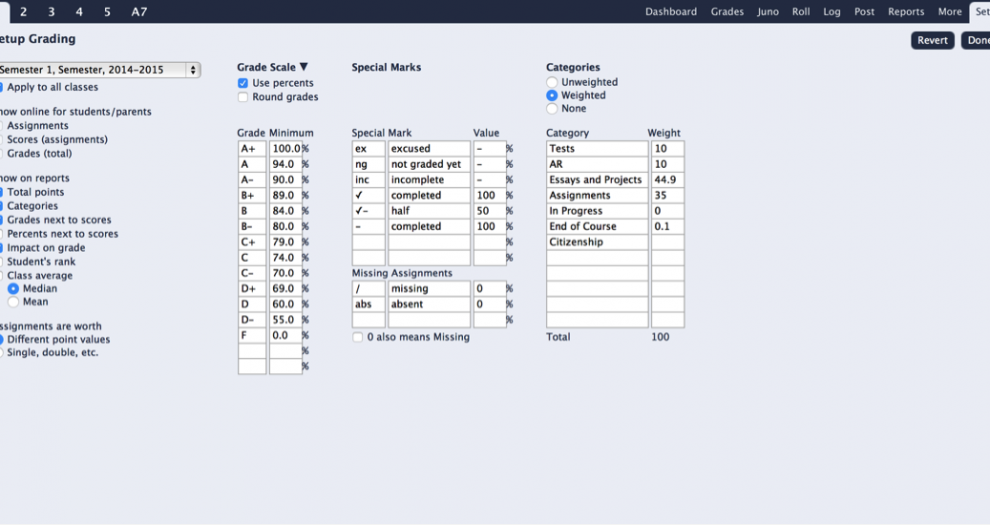
Start by going to Setup>Grading. Your options are letter grades, numeric codes (4 3 2 1 +/-), Pass/Fail, or any combination of these. You can use the same grade scale for all classes, or you can edit them separately for different classes (such as an Advisory period).
Categories
- If you weight your grades, you should select “Weighted” and then determine the category and its weights.
- If you assign a zero weight to a category, it doesn’t affect that student’s grades. You can create a citizenship category and give it zero weight so that it will still reflect in Jupitergrades. Alternatively, you can also create a separate class just for Citizenship.
- If a student doesn’t have a score for a particularly category, that category will not affect their grade. However, the other categories will have more weight to fill that gap. For example, suppose tests are worth 20% and assignments 80%. If you have no tests yet and only assignments, then those assignments will be worth 100% of their grade until you input a test score.
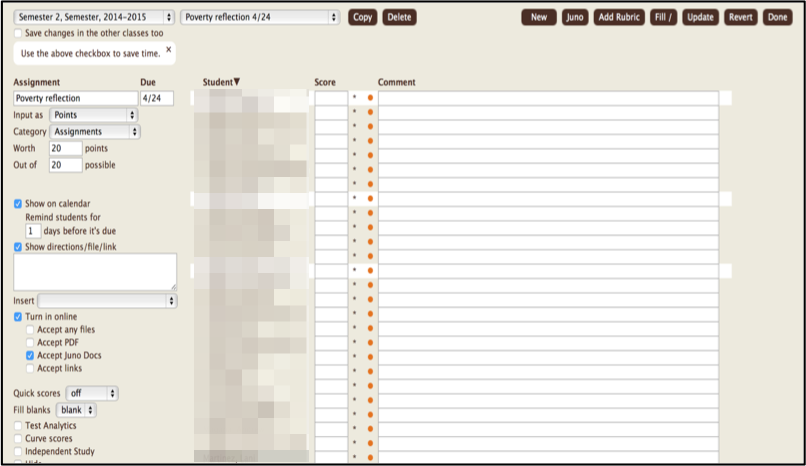
Creating a New Assignment

- At the top, click on Grades>Assignment. From there you will need to name your assignment and assign it a due date.
- For “Input As,” determine if the assignment will be worth points, percents, grades, extra credit, etc. For “Category,” choose the appropriate one for the assignment, then how many points it will be worth.
- If you want the assignment to apply to all classes, then check the box in the upper left-hand corner.
- If you want students to submit their assignment online, be sure to click on “Turn in Online.” Your submission options are any type of files, PDF, JunoDoc, and links. NOTE: some teachers do not like to accept screenshots from the iPad as a submission. If this is the case for you, then deselect “Any Files.”
- If you’d like the hide the assignment until you’re ready for them to submit, click on “Hide.” This is also useful after students have submitted it and you don’t want it to show on Jupitergrades until you’re done grading. I also use it so that students cannot submit their assignment after the due date unless they speak to me.
- After you’ve created it, click on “Done.”
Curve Scores
If your assignment is percent or point-based, you’ll have the option to curve scores. Simply input what scores counts as 100%, and what score counts as a D-.
Grading assignments
Online submissions
- When students submit an assignment online, an orange dot appears on the Dashboard and Assignment screens. Clicking on the dot takes you to the assignment submission in the Turn In Box.
- Clicking on the assignment name below “Turned In” will open the submission. Next to the assignment name will be a time stamp. If it is red, it was submitted late.
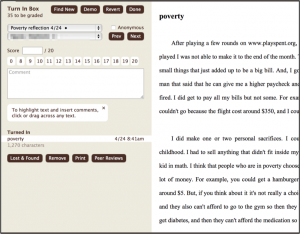 If a student submitted a PDF or Juno Doc, it will be displayed in the same browser. All other files will open a new window or tab.
- Submitted Juno Docs can be annotated directly in the text. Otherwise you assign a score and can leave comments in the Comments box.
- If a student submitted the wrong assignment, you can select “Remove” and the submission will be sent back to them. They can then resubmit.

Quick Scores:
If you’re checking homework in class and want to assign a grade on the spot, you can set the “Quick Scores” option to give the a check, 1234, or a custom grade.
Fill blanks
After grading assignments, you can use the “Fill Blanks” option to assign the same grade to everyone, or indicate missing for the students who did not submit the assignment.
Using the Calendar to post assignments
The calendar has multiple functions. It can be used to post the agenda and important dates. Many teachers use it to post homework, and any assignment created with a due date will automatically show in the calendar. I find that feature particularly helpful for students that are absent. If you post regularly, they can see what they missed so that they know what to make up.
- To post something to the calendar, click on Post>Calendar.
- Select a date, and under “Notice,” write the name of the event/assignment. Below that, write down details of or a Dropbox/Google Drive link to the assignment (a popular option with teachers) or your agenda.
- If you don’t want them to check ahead of time, uncheck “Remind students before…”
- It will automatically apply this post to all of your classes unless you indicate otherwise.
- If you want to post another event, simply click on that date in the calendar. Otherwise, select “Done.”
Seating Charts
I LOVE that I can create seating charts in JupiterEd! It is so handy for printing out for substitutes (and remembering names…right?).
- Select More>Seating Charts.
- Click on the student name you want to move, and then click where you want to place them. (If you place a student name on top of another, they swap places)
- Click on an empty space to add an empty seat. Click on an empty seat to remove it.
- When a new student is added to your class, that student’s name will have a dash around their name.
- Selecting “Shuffle” will seat them randomly. You can do this multiple times.
- If you don’t like the arrangement or accidentally selected Shuffle, “Revert” will bring them back. NOTE: Once you’ve moved on to another class or selected “Done,” you cannot revert back to the original seating chart.
Behavior Logs
 The behavior logs are a useful documentation tool for student issues. I tend to frequently document when a student misbehaves in your class, particularly if it becomes a pattern. This includes verbal warnings, changing seats, phone calls home, etc. A log is your friend when parents complain that “this is the firs that they’ve heard of it.”
- Select “Log.
- Click one or more students from your class, or type in the name of any students at the school.
- Select the discipline code from the checkboxes, and the consequence if applicable.
- Write a description of the incident.
- Select whether or not you want it posted online and/or sent to the parent.
- If you feel it needs to be referred to admin or a counselor, select that. NOTE: once you’ve referred it and that person has read it, you cannot go back and edit that referral.
- You can also log good behavior! I do this frequently on Fridays if I notice particularly stellar behavior or effort. Select “Good Behavior” under “Other” (or it will send as a Discipline Alert), and write a description for the parent and student to see.
- To see all discipline logs for students, click on “Show Log,” and then the student’s name. It will show all of the discipline logs from all of that student’s teachers.
Checking school-wide grades
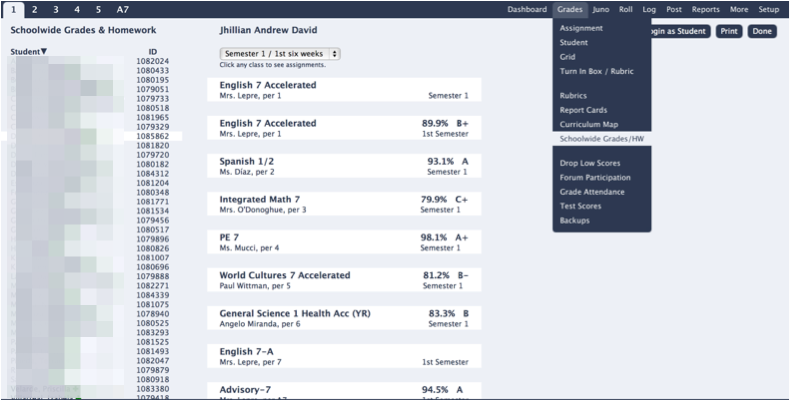 You can view your own students’ grades in other teachers’ classes. This is particularly useful when a student is performing poorly in your class, and you want to know if it’s just your class or also others.
- Select Grades>Schoolwide Grades.
- Click on the student’s name
- You can select a class and see how they’re performing in that class, including assignment grades and missing assignments.
- Additionally, you can “Login as Student.” This is similar to “Schoolwide Grades,” however it has an added benefit. If you go to “File Locker” you can view a log of submitted assignments and verify if they REALLY attempted to submit an assignment “Last night at 11:59 PM, right before the deadline, I SWEAR!”
Communicating with parents
 Jupitergrades is the easiest way to communicate with parents and students.
- Select Post>New Message.
- You can either type in the name of the student, or select students from the dropdown menu. If you need to send a message for specific students from different classes, just type their name.
- Select if you want to send it to students and/or parents
- Select from the other options if necessary (email link to assignments or report card is always useful if it’s a grade-related concern)
- Be sure to give your message a subject, and then type it as you would an email.
- Previewing the message for mistakes is always a good idea before sending it.
When students and/or parents reply to you, the message will be posted in Jupitergrades, as well as sent to you as an email. You can choose to login to Jupitergrades to reply, which will create a message log. If you reply directly by email, Jupitergrades will not keep a log of it.
That’s a lot for now!
I know I offered a lot of information, however if you’ve already used JupiterEd, then this is just a refresher. If you’re new to it (or are NOW interested in it!), then this will help you get started.
Next time I’ll be discussing the amazing features of JunoDocs, which is part of the JupiterEd LMS.
![]()
